How to Annotate Web Articles in Your Browser
Updated · 16 min read

Listen to this post
Contents
- TL;DR
- Table of Contents
- What it means to annotate a web article
- Why annotating beats passive reading
- How to annotate a web page, step by step
- 1. Get a clean reading view first
- 2. Skim before you mark
- 3. Highlight one idea at a time
- 4. Write a note in your own words
- 5. Use colors or tags with meaning
- 6. Close with a two-line summary
- How to highlight in Chrome, Firefox and other browsers
- What to look for in a web annotation tool
- Organizing, tagging and exporting your annotations
- Keep one place for everything
- Group by project, not by date
- Tag the idea, not the source
- Review on a schedule
- Export before you need to
- When a web page won't let you highlight or annotate
- Annotating together: classroom and team use
- Perspective: why we think annotation should help you understand
- Try it in Omphalis
- A simple weekly routine for annotating articles
- Common mistakes to avoid
- FAQ
- Can you annotate on Chrome?
- How do I annotate a web page so I can find it later?
- What do I do if a page won't let me select text?
- How many highlights should I make in one article?
- Can I annotate things other than web articles?
- Sources
- Recommended
To annotate a web article, you need a tool that sits on top of the page, lets you select text, and stores your highlight and note together with the passage they belong to. Chrome and Firefox don't do that on their own, so in practice you add a browser extension or save the article into a reading app and mark it up there. The method matters less than the habit: highlight sparingly, write a note in your own words, and make sure you can find both again in a month.
This guide covers how to do it step by step, how to choose a tool, how to organize what you collect, and what to do when a page refuses to cooperate.
TL;DR
- Browsers can't save highlights on a web page by themselves. You need an extension, a bookmarklet or a reading app to keep marks and notes.
- Highlight one idea per passage, then write a short note in your own words. Marks without notes are easy to forget.
- Pick a tool by what happens after you annotate: can you search, tag, export and reopen the exact passage?
- If a page blocks highlighting, save a clean copy of the article and annotate that instead.
- Omphalis lets you save an article, annotate it, get explanations of hard passages and keep notes attached to the original text. Start free.
Table of Contents
- What it means to annotate a web article
- Why annotating beats passive reading
- How to annotate a web page, step by step
- How to highlight in Chrome, Firefox and other browsers
- What to look for in a web annotation tool
- Organizing, tagging and exporting your annotations
- When a web page won't let you highlight or annotate
- Annotating together: classroom and team use
- Perspective: why we think annotation should help you understand
- Try it in Omphalis
- A simple weekly routine for annotating articles
- Common mistakes to avoid
- FAQ
- Sources
What it means to annotate a web article
Annotating means adding your own layer to someone else's text. That layer can be a color highlight, a margin note, a question, a tag, or a link to another source. On paper you do it with a pen. On the web the page isn't yours, so the tool has to remember where your mark belongs.
There are two broad ways this works:
- Overlay tools. An extension draws highlights on the live page and stores them for you. When you return to the page, the extension finds the passage again and redraws your marks.
- Reading apps. You save the article into an app, which stores a clean copy. You annotate that copy, so your marks don't depend on the original site staying the same.
Both approaches work. The difference shows up months later. If the original page changes, moves or disappears, an overlay may fail to find your passage. A saved copy keeps the text you actually read.
It also helps to separate this from the annotation tools aimed at design review, where teams drop comments on a website mockup or a live product page. Those are built for feedback on how a site looks. If you are reading to learn, you want the opposite: tools built around text, notes and recall.
Why annotating beats passive reading
Reading a long article once, without marking anything, leaves little behind. Annotating forces a decision at every paragraph: is this important, and why?
Cornell University's Center for Teaching Innovation describes social annotation as turning reading into a visible exercise, where students engage with a text by marking it up in the margins. The same logic applies when you annotate alone. Your margin note is evidence that you thought about the passage rather than scrolling past it.
The practical payoff is twofold. First, you read more slowly at the points that matter. Second, you leave yourself a trail: when you come back, you read your ten notes instead of rereading 3,000 words. For more on turning that into a habit, see our guide to reading comprehension strategies that work for adults.
How to annotate a web page, step by step
The steps are nearly identical in any tool. Here is the sequence that works whether you are a student, a researcher or someone clearing a backlog of saved links.
1. Get a clean reading view first
Ads, pop-ups and sticky banners make highlighting clumsy. Many browsers offer a simplified view. Chrome's reading mode is designed to help you focus on text and reduce on-screen distractions. A reading app does this automatically when you save an article.
2. Skim before you mark
Read the headline, the subheads and the first and last paragraphs. You are looking for the argument. If you highlight before you know what the article claims, you end up coloring half the page.
3. Highlight one idea at a time
Select the sentence, or part of it, that carries the point. Avoid highlighting whole paragraphs. A useful rule: if more than a fifth of the text is highlighted, nothing stands out.
4. Write a note in your own words
This is the step most people skip, and it is the one that matters. A note can be:
- A paraphrase: "Author says the effect disappears after 12 months."
- A question: "Does this hold outside the US?"
- A link: "Contradicts the paper I read Tuesday."
- An action: "Check the source for this figure."
Keep it to one or two lines. The point is to prove to your future self that you understood it.
5. Use colors or tags with meaning
Decide on a small system and stick with it. For example: yellow for claims, green for evidence, pink for things you doubt. Tags work better than colors once your library grows, because you can search them.
6. Close with a two-line summary
After the last paragraph, write what the article says in two sentences, plus one thing you'd do with it. This is the note you will most often reread.
How to highlight in Chrome, Firefox and other browsers
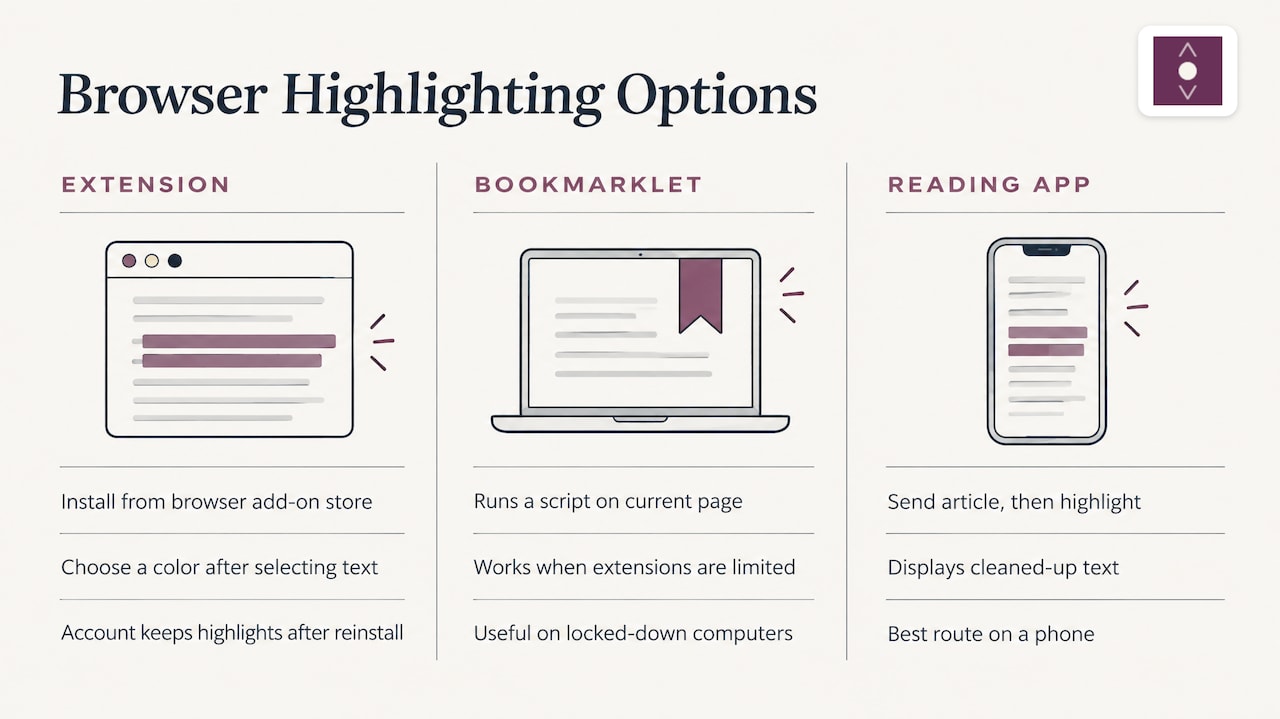
If you want to highlight in your browser today, you have three realistic options.
Use an extension. Install one from the Chrome Web Store or Firefox Add-ons, then select text on a page and choose a color. Look for one that stores highlights in an account so they survive a browser reinstall. Omphalis has a browser extension for Chrome and Firefox that saves the article you are reading into your library so you can annotate it there.
Use a bookmarklet. A bookmarklet is a bookmark that runs a small script on the current page. It is useful in browsers where extensions are limited, or on a locked-down school or work computer.
Save to a reading app. Send the article to an app, then highlight inside it. This avoids most layout problems, because the app shows a cleaned-up version of the text. It's also the best route on a phone, where extensions are rare.
Whichever you pick, test it on one article you care about before you commit your research to it.
What to look for in a web annotation tool
Most readers search for a "highlighter" and then discover, three weeks later, that their notes are trapped. Judge any tool on these criteria before you build a library in it.
| Question | Why it matters |
|---|---|
| Do highlights and notes stay attached to the original passage? | You want to jump from a note back to the exact sentence in context. |
| Is the text saved, or only a link? | Pages get edited, moved or put behind paywalls. |
| Can you search across all notes? | A library you can't search is a pile. |
| Can you tag or group items into notebooks? | Projects, courses and topics need separate spaces. |
| Can you export? | Your notes should leave with you if you change tools. |
| Does it handle more than web pages? | Real research includes PDFs, EPUBs, Word files and videos. |
| Does it help you understand, not just mark? | Hard passages need explanation, not just a yellow bar. |
The last row is where most simple highlighters stop. Marking a sentence you don't understand just moves the confusion into your notes.
Organizing, tagging and exporting your annotations
Annotating is half the job. Retrieval is the other half.
Keep one place for everything
If highlights live in the browser, PDF notes in a different app and podcast thoughts in a notebook, you will not find anything. Aim for one library that holds articles, papers and other media together. Our piece on organizing academic papers into an auditable workflow shows how researchers set this up.
Group by project, not by date
A notebook for "thesis chapter 2" is more useful than a folder called "October." Date is something the tool tracks for you. Purpose is what you have to decide.
Tag the idea, not the source
Tags like "methodology," "counterargument" or "pricing data" let you pull related passages from fifty articles in seconds. Tags like "article" or "read" tell you nothing.
Review on a schedule
Set ten minutes weekly to reread new notes. Rewrite the fuzzy ones. Delete the ones you can no longer explain. If you study for exams, convert key highlights into questions; the PDF highlighting strategy that turns highlights into flashcards works the same way for web text.
Export before you need to
Test exporting early. Export a notebook once, open the file and check that the highlights, notes and source links are all there. It takes two minutes and protects months of work.
When a web page won't let you highlight or annotate
Sometimes selecting text does nothing, or the highlight vanishes when you reload. Here is what to try, in order.
- Switch to a reading view. Reader or reading mode strips scripts and styling that interfere with selection.
- Save the article to a reading app. The saved copy is plain text, so highlighting works regardless of what the original site did.
- Check for a paywall or login wall. If you can read the full article while logged in, save it from that logged-in session. If you can't, the tool can only save what you can see.
- Look for a PDF version. Many publishers and institutions provide one, and PDFs are easy to mark up. For tool ideas, see these ways to mark up and manage PDFs, or our own guide on how to annotate PDFs on Windows, Mac and mobile.
- Handle dynamic pages differently. Pages that load content as you scroll or show interactive charts may confuse overlay tools. Save the page first, then annotate the saved version.
- Fall back to a screenshot with a note. It is the last resort, since you lose searchability, but it captures a chart or image when nothing else will.
For video and audio, the same idea applies: work from a transcript. Our walkthrough on how to annotate YouTube videos into study-ready notes shows the workflow.
Annotating together: classroom and team use
Shared annotation turns a web article into a conversation. A teacher assigns a reading, students mark passages and reply to each other's notes, and the discussion happens in the margins before class starts. Cornell's teaching center, cited above, treats this as a way to make reading collaborative and visible.
If you try it, give students a specific job: one question per reader, one disagreement, one connection to another reading. Open-ended instructions like "annotate this" produce highlights with no thought behind them.
Perspective: why we think annotation should help you understand
We built Omphalis for people who save more than they read. The usual pattern is familiar: you bookmark an article, feel productive, and never open it again. Highlighting alone doesn't fix that, because a yellow line on a sentence you don't fully grasp is just decoration.
Our view is that annotation should lead to comprehension. That is why Omphalis cleans and structures the article, explains difficult passages inline, and keeps your own notes attached to the original text. You stay with the full source instead of a shortcut around it, and you can ask questions and get answers with citations back to the passage.
We designed it to favor deeper understanding over speed. Summaries can give you a feeling of having read something. We would rather you finish with notes you can defend, connections to other things you have saved, and the ability to reopen the exact passage whenever you need it.
Omphalis Team
Try it in Omphalis
Omphalis is a place to save articles, papers, podcasts and videos, read them in a clean format, and annotate them with notes tied to the original passage. You can import PDFs, EPUBs, Word documents and feeds, listen to articles with natural voice narration, and export your notebooks when you need them elsewhere. Our highlights and notes reopen the passage they came from, so you never lose the context.
There is a free plan, so you can test the workflow on a real article. Paid plans, listed on the pricing page, are Pro at $9 per month or $90 per year, Premium at $19 per month or $190 per year, and Scholar at $39 per month or $390 per year. Unit packs start at $10 one-off. Paid plans include fuller features such as deep reading, PDF extraction, advanced listening and import and export. If you want the idea behind the product first, read the case for comprehension, or see how to save articles, read them and keep your notes.
A simple weekly routine for annotating articles
Tools only help if you use them consistently. Here is a routine that fits into a busy week.
Monday to Friday, as you read: Save anything interesting to your library instead of leaving tabs open. Don't annotate on the first pass if you're short on time; just save.
Two reading sessions a week: Pick three saved articles. For each, skim, highlight at most five passages, and write one note per highlight. Finish with the two-line summary.
Once a week, ten minutes: Reread your summaries. Tag them. Move anything that belongs to a project into its notebook. Look for connections between articles: two sources that agree, or one that undercuts another. Omphalis can suggest related content, and our docs explain how to evaluate suggested connections so you keep the useful ones.
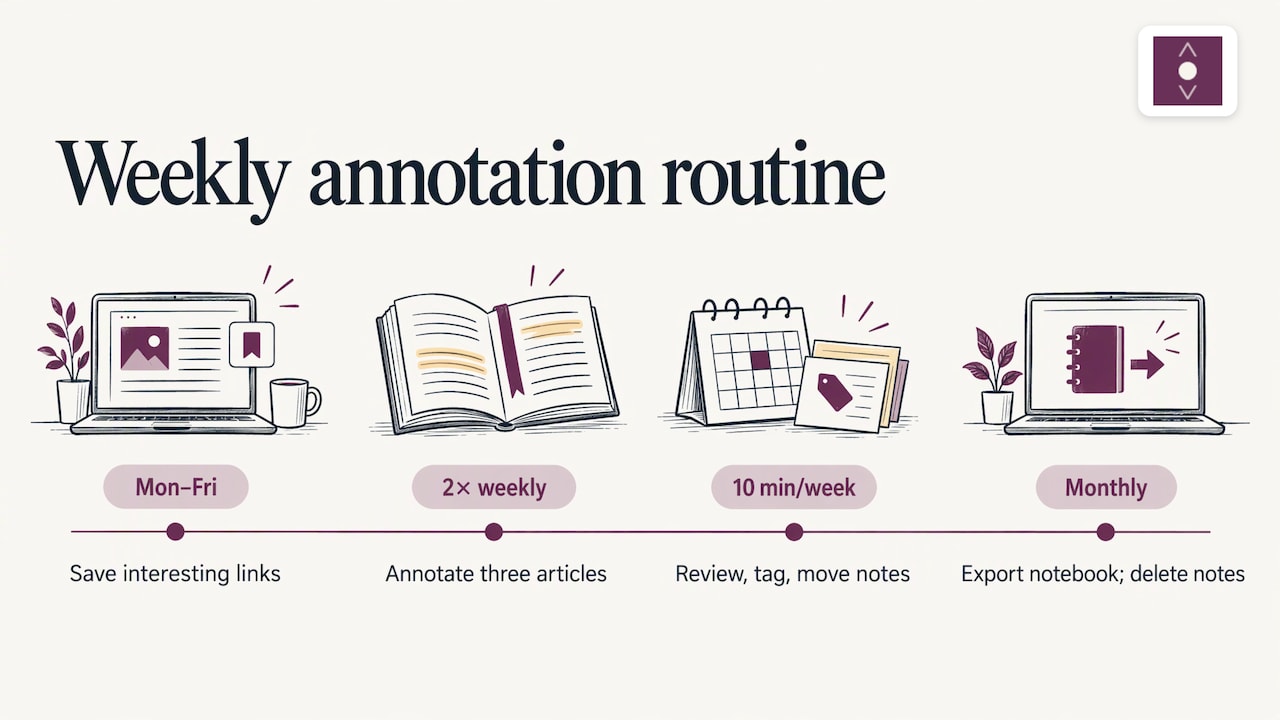
Once a month: Export a notebook, and delete any note you can no longer explain.
If you also write, keep your own drafts near the reading that feeds them. We cover that in keeping your own writing and other people's reading in one place.
Common mistakes to avoid
Highlighting everything. If the page looks like a highlighter exploded, you've postponed the thinking. Limit yourself to a handful of marks per article.
Skipping notes. A highlight tells you what caught your eye. A note tells you why. Write the why.
Annotating only the live page. If your tool stores marks relative to a URL and the page changes, you can lose your place. Prefer tools that keep a copy of the text.
Using five tools at once. Every extra place to look is another reason not to look. Pick one library.
Never going back. An annotation you never reread is a diary entry. Build the weekly review into your calendar.
Trusting an explanation without checking it. When a tool explains a passage, read the original sentence next to it. Good tools show you the source so you can verify. That's why we keep explanations and citations attached to the passage.
FAQ
Can you annotate on Chrome?
Yes, but not with Chrome alone. You add an extension that lets you select text, apply a highlight and attach a note, or you save the article to a reading app and annotate there. Chrome's built-in reading mode can make pages easier to read, but it is not a place to keep highlights. The Omphalis browser extension works with Chrome and Firefox.
How do I annotate a web page so I can find it later?
Use a tool that saves your highlights and notes to an account, then add tags or put the article in a notebook. Write a short summary note at the end of each article. Later, search your notes by keyword or tag instead of hunting through browser history.
What do I do if a page won't let me select text?
Open the page in a reading view, or save it to a reading app and annotate the saved copy. If the site is behind a login, save it while you are signed in. If none of that works, look for a PDF version of the same article, which is usually easy to mark up.
How many highlights should I make in one article?
There is no official number, but a good working limit is about five to ten for a typical long article, each paired with a short note. The goal is to make your selections meaningful. If most of the page is highlighted, go back and keep only the passages that carry the argument.
Can I annotate things other than web articles?
Yes. You can mark up PDFs, EPUBs, Word documents and video or podcast transcripts the same way. Using one library for all formats keeps your notes searchable together. See our guides on annotating Word documents and PDFs on an iPad.
Sources
- Social annotation, Cornell University Center for Teaching Innovation
- Use reading mode in Chrome, Google Chrome Help
- Kami alternatives: 6 ways to mark up and manage PDFs